
Finderで選択したフォルダ内にある画像を指定した横幅でリサイズしてImageOptimで容量圧縮するApplescriptです。
(お約束)ご利用は自己責任でお願いします
こんな感じでマウスで選択しておきます。
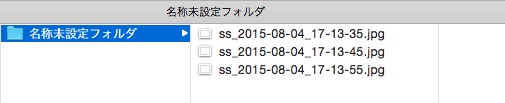
でApplescriptを起動すると、この中のファイルを指定サイズでリサイズしてImageOptimで容量圧縮します。
(*
finderで選択したフォルダ内にある画像を横幅 imgWidth に設定したサイズでリサイズしてImageOptimで容量圧縮
*)
tell application "Finder"
	activate
	set imgWidth to text returned of (display dialog "画像の横幅を何pxにしますか? " default answer "600") --ダイアログを出してそこにimgWidthを入れる
	set selectFolder to selection as string --finderで選択しておく selectFolderにフォルダのフルパスが入る
	open application file "ImageOptim.app" of folder "Applications" of startup disk --ImageOptim起動しておく
	repeat with theFile in list folder selectFolder without invisibles --フォルダ内リピート(不可視ファイル以外)
		set fullPath_theFile to (selectFolder & theFile) as string --フォルダとファイル名を合体してフルパスを作る
		activate
		--display dialog fullPath_theFile --ファイル名を表示(確認したいときはコメント外す)
		tell application "Image Events" --画像処理
			launch -- アプリを起動
			set theImg to open fullPath_theFile -- 変数theImgに開いたファイルを代入
			scale theImg to size imgWidth -- 変数theImgの解像度を横imgWidthに変更
			save theImg in fullPath_theFile as JPEG with icon -- 変数theImgをJPEGで保存
			close theImg -- 変数theImgを閉じる
		end tell
		tell application "ImageOptim"
			activate
			open fullPath_theFile --ImageOptimで容量圧縮
		end tell
	end repeat
	activate
	display dialog "横幅" & imgWidth & "pxで画像リサイズ 終了" giving up after 1
	tell application "ImageOptim"
		activate --ImageOptim確認のためにアクティブ
	end tell
end tell
個人的利用アプリにつき、画像が指定した横幅より小さかったらどうするのかとか、間違ってフォルダでなくファイルを選択してたらどうするのかとか、そういう数々のイレギュラールートは考慮してませんので、ご了承ください。
以下参考にさせていただきました。ありがとうございました。
参考: 03)フォルダ選択 choose folder – たけうちとおるのスクリプトノート
参考: AppleScriptでフォルダ階層以下すべての指定種類のファイルリストを取得〜指定kind救出作戦 : プラスα空間
参考: ビギナーのAppleScript – 画像を一括変換したい。(完成)【応用試行錯誤編】
参考:Finder上で選択中の画像を横幅400ドットにリサイズ

コメント
[…] Finderで選択したフォルダ内にある画像を指定した横幅でリサイズしてImageOptimで容量圧縮するApplescript […]